Using PECS (Picture Exchange Communication System) and signs form an integral part of therapy for a lot of speech language pathologists that work with children who are predominantly non-verbal and require a functional communication system. For one little guy, who was diagnosed with Autism Spectrum Disorder,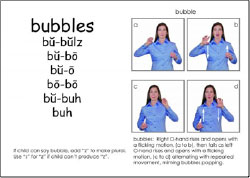 Severe Apraxia of Speech and a seizure disorder, I attempted the “Sign to Talk” program (Tamara Kasper, M.S., CCC-SLP, BCBA; Nancy Kaufman, M.A., CCC-SLP). The program is offered as a “bridge to vocal communication for children that are not yet vocal imitators.” The program consists of two sets of flashcards and instruction manuals. The flashcards are pictures of the object or verb on one side and on the back they have the picture of the sign for the word. On the back, each card also displays a series of ”successive approximations” of the target word based on least physiological effort, as proposed by Nancy Kaufman.
Each set costs approximately $150. However, you can purchase the Sign to Talk app for the iPad for about $20. While the flashcards are a lot easier to use during therapy, the difference in cost definitely tilted the scale in that direction for me. Since my little guy had a hard time attending to flashcards in the first place, I began the program by selecting a group of objects/ toys that were motivating to him and used the objects instead of the flashcards. We worked on the signs for several weeks until he could produce the sign with minimal prompts to request his favorite objects or make choices. I then found pictures of the objects on “Google Images” and put them on index cards. I didn’t put a picture of the sign on the back since both the parents and myself were now familiar with the target signs. I also hand wrote Nancy Kaufman’s “successive approximations” on the back. The advantage to making your own cards (apart from the obvious cost factor) was that I could include pictures that are not in the repertoire of the original set. I did have to make my own “successive approximations” for those words, but it does get fairly easy once you’ve done a few. If you are familiar with the Kaufman cards, it won’t be hard at all. Since my little guy was by now comfortable using signs, I introduced the flashcards to see if he could produce the signs on demand. As his consistency increased, I gradually introduced the speech portion, which is the successive approximation of the syllables. Since we also use signs, it alleviates some of the frustration that used to follow speech imitation when it was attempted in isolation without signs. Of course, I always use P.R.O.M.P.T (PROMPT Institute) along with the signs. We are seeing significant progress in his speech imitation skills. More importantly the frustration and behaviors that accompanied any speech imitation task earlier are now almost completely eliminated.
 Once Sam’s tactile defensiveness was significantly reduced, my next goal was to stabilize his jaw and increase jaw grading (i.e. opening and closing of his mouth to various jaw heights without jaw sliding or jerking). Since Sam tended to “fix” his jaw at jaw height 1 (closed mouth position) during speech, my objective was to move him gradually through Sara R. Johnson’s Bite Block hierarchy. Unless Sam was able to lower his jaw to jaw height 3 or 4, production of vowels such as /Ɔ/ would be challenging. We started with Bite Block #2 and within several weeks were able to move to Bite Block #6, which requires considerable jaw opening. Sam can now hold a lower jaw position without sliding. As a part of a comprehensive oral motor or oral placement program, we also worked on lip rounding, lip seal and tongue retraction. Sara R. Johnson’s Horn and Straw Hierarchy’s were employed for this purpose. In addition, a tongue depressor with added “weights” (pennies taped to both ends) were used to build lip strength and lip closure.