AJ’s Journey: From Non-Verbal to Speech Production

I met AJ in April 2014, a mere 6 months ago. His story makes me realize why I do what I do, day in and day out. When I met AJ, he was 9 years old. He had a diagnosis of Autism. His family had relocated from India to Orange County a few months prior to our meeting. His mother later told me that they had made the move specifically because she wanted AJ to receive P.R.O.M.P.T therapy. His mother also revealed how AJ had been through no less than twelve speech therapists, several ABA therapists, and a few occupational therapists. They had also tried Neuro-Feedback therapy; several detox programs, and nutritional supplements, all in the hope that they would help with speech production. After all those setbacks and disappointments, it still amazes me that this family decided to move across the world to try another program. But I guess hope is a crazy thing.

During the initial evaluation, I realized that AJ was truly non-verbal. There were no vocalizations on demand. When asked to say “ah,” he would open his mouth, but there was no sound. He could imitate some lip movements with tactile prompts and cues, but again, without any vocalizations. He did spontaneously babble labial sounds like /baba/ and /mama/, but there was no intentional speech. I realized that at age 9, with little to no progress after years of speech therapy sessions, the odds were stacked against us. When I tried to explain this to his mother, she was quick to respond, “But it can’t hurt to try, right?” I knew then, I had to at least try. P.R.O.M.P.T therapy with tactile cues, in combination with Sara Johnson’s TalkTools® was definitely the way to go.

I saw AJ once a week for 45-minute sessions. His mother would sit through each session, carefully taking notes about the activities and target sounds and words. She would then practice all the activities each day during the week. This video is proof of AJ tremendous progress and his mother’s singular dedication. It was taken after merely 25 sessions of P.R.O.M.P.T. therapy. While there is clearly a long way to go, his incredible achievement so far, makes the future look bright and positive.

Read With Me!

Read with Me! (Shari Robertson, Ph.D., CCC-SLP) Stress-Free Strategies for Building Language and Pre-Literacy Skills

During a Speech-Language Pathology conference in Spring 2013, I was lucky to be able to attend a presentation by Shari Robertson.  Her focus is in the area of building oral language skills as a precursor to literacy skills.  During her presentation she brought to our attention how oral language skills in preschoolers are a strong predictor of later reading comprehension skills.  Children therefore need to have strong oral language skills to have strong reading skills!  However, to me the most important feature of the presentation was not the dire warning, but the practical, easy to use and fun ideas that we can incorporate in our therapy sessions to build these early pre-literacy skills.  Her program is called “Read with Me!”  It aims to build strong oral language skills by encouraging children to participate actively in a fun and enjoyable manner.  She uses six main strategies:

1) Echo Reading:  Here we choose books with a simple story sequence with one main idea on a page.  Echo reading as you would expect is merely having the child imitate the sentences after you say them.  You can cue the child by saying, “Copy Me.”  Shari highlights how the goal is to encourage participation, not perfection.  There should be no pressure on the child to participate.  If he is unwilling, you simply invite, pause and then keep going.  Some of the books that work well with this strategy as recommended by Shari are:

  • Where is the Green Sheep?
  • I went Walking
  • Dinosaur Roar

Some of the areas of language that we can target using this strategy are: participation, turn taking, prosody, intonation, and vocabulary.

2) Paired Reading: For this strategy we choose books that are predictable and contain simple, repetitive phrases.  We then read the book several times with the child attending till he/ she is familiar with the book.  At that point, you pause and use voice inflection and facial expressions to indicate that is the child’s turn to read.  You can vary the amount of material the child “reads” from a single word to phrase to a sentence.  Again, Shari talks about not forcing the child to participate.  If he/ she is unwilling, you can read the phrase yourself and keep going.  Some of the books that work well with this strategy as recommended by Shari include:

  • Silly Sally
  • One Duck Stuck
  • Each Peach Pear Plum

3) Questions:  This strategy was one that makes all therapists (myself included) who work on concrete “WH- questions” pause and rethink our goals.  Shari suggests using open-ended questions such as “What do you think…?” “How would you feel if ….?”  “I wonder who might be ….?”  It is fairly evident to all how these questions would elicit longer and more complex utterances.  In addition, for all of us therapists that work with children on the Autism Spectrum, this is exactly the area we want to develop.  It effectively targets reasoning, critical thinking, and perspective taking skills that are so challenging for children with ASD.  Some books that work well with this strategy as proposed by Shari include:

  • Is Your Mama a Llama?
  • I Ain’t Gonna Paint No More.
  • Rosie’s Walk

4) Predicting:  Here you want to use books that give the child an opportunity to make a prediction.  Flap books work well.  Encourage the child to predict what might happen next, or what may be under the flap.  The predictions do not need to be exact.  Children enjoy making silly guesses.  Again, for our little ones on the Autism Spectrum, making guesses (both logical and whacky) are important, yet challenging skills.  Some books that work well with this strategy as proposed by Shari include:

  • Who is Driving?
  • The Look Book
  • Oh No George!

5) Using Wordless Books:  Wordless books are an excellent way to elicit a language sample.  The idea is to choose a book that has a simple, sequential format.  You look at the book with the child and talk about the actions and how the characters might feel.  Encourage the child to talk about the events in the book.  You could even use the questioning and predicting strategies with wordless books.  Shari talks about a brilliant strategy that you could use with wordless books, which is using little post it notes to help the child be the “author.”  You can have the child narrate his version of the story while you write it on post it notes.  Then his version of the story can be read again.  Post it notes with speech bubbles can be used to make up dialogues between characters.  This could be an excellent strategy to build perspective-taking skills in children on the Autism Spectrum.  Some wordless books that Shari uses with this strategy are:

  • Good Dog, Carl
  • Good Night Gorilla
  • Hug

6) Reader’s Theater:  This is easily my favorite strategy.  It uses a child’s natural interest in dramatic play to reenact a familiar literature.  (Of course, for our little ones on the Autism Spectrum, developing dramatic play may in fact be the goal rather than a means to an end,)  For this purpose you want to choose books that have sequential events or activities that can be easily acted out.  You can include simple props or puppets for dramatization.  This strategy will build a deeper comprehension of the book.  In addition, encouraging adaptations and changes to the story will yield some wonderful spontaneous language while tapping into the child’s imagination.  Some books that work well with this strategy as proposed by Shari include:

  • Clap Your Hands
  • From Head to Toe
  • Seals on the Bus
  • Press Here (This one is my personal favorite!)

In her presentation, Shari also talks about building Phonemic Awareness skills and vocabulary, which are so important for all our children with language delays.  In addition, these strategies are so simple that they are brilliant.  They are easy enough for parents to pick up and carry on at home.  One of her quotes that stuck with me was “Children learn to talk by talking, they learn to read by talking AND reading.”  Additional resources for the program are available at www.dynamic-resources.org.

Adapting the Sign to Talk Program

Using PECS (Picture Exchange Communication System) and signs form an integral part of therapy for a lot of speech language pathologists that work with children who are predominantly non-verbal and require a functional communication system.  For one little guy, who was diagnosed with Autism Spectrum Disorder,bubbles 
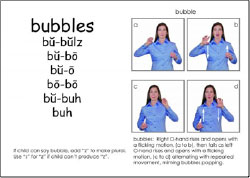
Severe Apraxia of Speech and a seizure disorder, I attempted the “Sign to Talk” program (Tamara Kasper, M.S., CCC-SLP, BCBA; Nancy Kaufman, M.A., CCC-SLP).  The program is offered as a “bridge to vocal communication for children that are not yet vocal imitators.”  The program consists of two sets of flashcards and instruction manuals.  The flashcards are pictures of the object or verb on one side and on the back they have the picture of the sign for the word.  On the back, each card also displays a series of ”successive approximations” of the target word based on least physiological effort, as proposed by Nancy Kaufman.

green-bubbles

Each set costs approximately $150.  However, you can purchase the Sign to Talk app for the iPad for about $20.  While the flashcards are a lot easier to use during therapy, the difference in cost definitely tilted the scale in that direction for me.  Since my little guy had a hard time attending to flashcards in the first place, I began the program by selecting a group of objects/ toys that were motivating to him and used the objects instead of the flashcards.  We worked on the signs for several weeks until he could produce the sign with minimal prompts to request his favorite objects or make choices.  I then found pictures of the objects on “Google Images” and put them on index cards.  I didn’t put a picture of the sign on the back since both the parents and myself were now familiar with the target signs.  I also hand wrote Nancy Kaufman’s “successive approximations” on the back.  The advantage to making your own cards (apart from the obvious cost factor) was that I could include pictures that are not in the repertoire of the original set.  I did have to make my own “successive approximations” for those words, but it does get fairly easy once you’ve done a few.  If you are familiar with the Kaufman cards, it won’t be hard at all.  Since my little guy was by now comfortable using signs, I introduced the flashcards to see if he could produce the signs on demand.  As his consistency increased, I gradually introduced the speech portion, which is the successive approximation of the syllables.  Since we also use signs, it alleviates some of the frustration that used to follow speech imitation when it was attempted in isolation without signs.  Of course, I always use P.R.O.M.P.T (PROMPT Institute) along with the signs.  We are seeing significant progress in his speech imitation skills.  More importantly the frustration and behaviors that accompanied any speech imitation task earlier are now almost completely eliminated.

Treating Vowels: A Tactile Treatment Program (Part III)

The second part of Sam’s treatment for vowels was the speech production or articulation portion.  We began by targeting the round vowels such as /Ʊ/.  A lesson plan was created that included auditory bombardment, production of the sound in isolation with PROMPT and tactile cues, production of the sound in words using a functional or communication task, and production of the sound in a word using drills.

For the round vowels multiple tactile cues were provided to elicit the lip rounding.  The TalkTools Tactile Tubes were particularly helpful.  Since they come in different diameters, different tubes were used to elicit different sounds.  Initially the use of Renee R. Hill’s and Sara R. Johnson’s Ice Stick was also very helpful to elicit lip rounding.  The added thermal stimulation provided by the cold Ice Stick yielded some good results.  The Ice Stick placed horizontally was used to elicit lip retraction for vowels such as /i/.  In addition, two Bite Blocks placed between the molars simultaneously on both sides also assisted with stabilizing the jaw height while aiding lip retraction.

Following the principals of Hodson and Paden’s Cycle’s Approach, a vowel was targeted for a few weeks and then a new vowel was selected.  Once all the sounds were targeted, the same targets were then re-cycled.  The functional or communication tasks were the highlight of the session.  This portion is important since it gives us as therapists the opportunity to shape the sound in one phonetic context using multiple trials.  For example, when targeting the “ee” sound, I used the Honey Bee Tree game.  I worked on the words “tree” and “leaf” when Sam placed the leaves on the tree.  When he pulled the leaves out and the bees fell, I targeted the word “bee.”  I try to elicit the word at least 8-10 times per activity.  In a half hour session, I try to include at least 4-5 similar communication activities.  Apart from being able to target the same word through multiple repetitions, the communication task also gives the child an opportunity to use the sound in a meaningful way rather than simply naming pictures in a drill.

As a part of the generalization portion of the lesson, I would have Sam’s parent lead one of the activities in the clinic (so Sam can produce the target word with a person other than me) and I also provided the parents with a copy of the drill pictures to practice at home.

Treating Vowels: A Tactile Treatment Program (Part II)

When Sam began therapy he had difficulty tolerating any sensory input in or near is mouth. Bringing a toothette close to his mouth would lead to an involuntary tongue protrusion to resist any stimulation. Placing a bite block between his molars would lead to gag reflex. My first goal therefore was to decrease his tactile defensiveness, while building his proprioceptive awareness (knowing where his lips, tongue and jaw are in space) of his oral structures. The first step of course, was to build his trust and comfort level with me and the tools I would use. We named the toothette with the vibrator “Mr. Tickles.” Mr. Tickles would always start the session. Sam could tell Mr. Tickles where he wanted to be tickled. We would usually start with the palm of his hand or his arm and gradually work our way to his mouth. Within a few sessions, Sam could tolerate several minutes of stimulation with a toothette without any negative reactions.

vibrator-tooteth
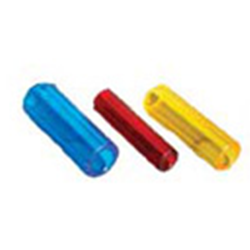
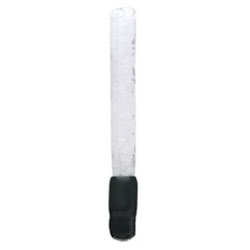
Once Sam’s tactile defensiveness was significantly reduced, my next goal was to stabilize his jaw and increase jaw grading (i.e. opening and closing of his mouth to various jaw heights without jaw sliding or jerking). Since Sam tended to “fix” his jaw at jaw height 1 (closed mouth position) during speech, my objective was to move him gradually through Sara R. Johnson’s Bite Block hierarchy. Unless Sam was able to lower his jaw to jaw height 3 or 4, production of vowels such as /Ɔ/ would be challenging. We started with Bite Block #2 and within several weeks were able to move to Bite Block #6, which requires considerable jaw opening. Sam can now hold a lower jaw position without sliding. As a part of a comprehensive oral motor or oral placement program, we also worked on lip rounding, lip seal and tongue retraction. Sara R. Johnson’s Horn and Straw Hierarchy’s were employed for this purpose. In addition, a tongue depressor with added “weights” (pennies taped to both ends) were used to build lip strength and lip closure.

Treating Vowels: A Tactile Treatment Program (Part I)

Sam came in with a diagnosis of Autism Spectrum Disorder and Apraxia of Speech. During the initial intake over the phone, his mother informed me that her main concern for Sam’s speech was his vowel production. And sure enough, all of Sam’s vowels were substituted by a neutral /Ʌ/. There was no discrimination even for round vowels like /Ʊ/ or /Ɔ/. On further observation, it was evident that Sam had oral motor deficits. There was limited if any jaw grading. He tended keep his jaw height at 1 for all his words. His lips did not appear to dissociate from his jaw with no rounding or retraction. Similarly, tongue and jaw dissociation was also limited. Basically, he used his jaw to elevate his tongue. For vowels, the tongue stayed at the floor of his mouth with little to no tongue elevation. Sam had difficulty imitating non-speech oral postures such as a lip pucker, smile, a wide open mouth, even with visual cues like a mirror. It was clear that using purely auditory and visual models to increase his vowel repertoire was a path to frustration and limited success. I therefore planned a unique treatment program that used a two pronged approach:

  • Building sensory awareness, increasing strength, coordination, grading and dissociation skills,
  • Using tactile approaches (P.R.O.M.P.T, TalkTools Therapy Tactile Tools for Apraxia of Speech and TalkTools Ice Stick) to build speech production for vowels.
tactile-tubes-apraxia

TACTILE TUBES FOR APRAXIA

ice-stick

ICE STICK


Whole Body Listening Larry at School

Review of “Whole Body Listening Larry at School” by Kristen Wilson and Elizabeth Sautter

This book is the sequel to “Whole Body Listening at Home”. Personally, I prefer to start the instruction on holistic listening with this book rather than the “Whole Body Listening at Home” only because it seems like such an integral and critical part of school learning. In addition, comments like “You need to do better listening,” and “Pay attention” often occur more frequently in the classroom than at home.

I think, what this book does, like most other Social Thinking Curriculum materials, is to break down an abstract concept like “better listening,” “paying attention” into concrete segments using simple child-friendly language and pictures. When I first reviewed the book, I have to admit I was a little disappointed I hadn’t thought of this myself. It seems obvious and intuitive. The book uses school-age characters to describe Whole Body Listening. Whole Body Listening, according to the book includes using your eyes, ears, hands, feet, brain, and heart to listen. The situations used to teach how each of these body parts is actively involved in listening are easily relatable for most children. Breaking down the process of active listening by explaining the role of each individual body part makes so much more sense than simply asking the child to show “good listening” since the book actually explains what that means.

For the lesson, I took my time reading the book with my client. We discussed each picture in detail talked about what she saw and what Lea and Luka (the characters in the book) should do differently. We also did some role-play to make it fun and engaging. A critical piece that the authors discuss is making a link between the behavior to the feelings and emotions of others. Talking about how the listener feels when you are not listening with your whole body was challenging for my client. But making that connection repeatedly throughout the book discussion did eventually pay off. The Social Thinking website has a free download that could be incorporated in the lesson. It is a coloring page with pictures of all the body parts involved in Whole Body Listening.

I used several weeks to really hone in the concept of Whole Body Listening. I was surprised with how many activities and ideas were available online to incorporate into the lesson. I thought it might be helpful to list the resources I used to make it easier for readers to plan their “Whole Body Listening” lessons.

  • In addition to the poster/ coloring page available on www.socialthinking.com, I used Mr. Potato Head to reinforce the concept. While the eyes, ears, hands, and feet were available, I wanted to also include the heart and the brain. So I cut out a heart shape from cardstock and used Velcro to attach it on Mr. Potato Head. I also used an image of a brain. When my client added each piece to Mr. Potato Head, she had to explain what body part needs to do for Whole Body Listening.
  • I also used the “Biscotti Kid” video that is available on YouTube. It is a hilarious 5 minute video by Sesame Street ©. The video demonstrates how hard Whole Body Listening is for Cookie Monster, but finally he gets it and wins a black and white cookie belt. It is an excellent kick off for a discussion on Whole Body Listening and why it can be challenging sometimes. I used it to list some of the common distractions in my client’s classroom.
  • I also used the Whole Body Listening portion of Kathleen Pedersen’s “Monster Fun! Teaching Manners and Expectations. It is a free digital download on TeachersPayTeachers. It is a fun book with colorful images that review all the body parts involved in Whole Body Listening. This is Kathleen’s blog: http://growingkinders.blogspot.com.
  • “Howard B Wigglebottom Learns to Listen” by Howard Binkow is a book Howard, who gets into a lot of trouble for not listening. It is an excellent accompaniment to the Whole Body Listening lessons. The “We Do Listen Foundation Media Center” has an online animated version of the book with excellent sound effects. The website to access the online video is https://wedolisten.org/?.

Overall, I think it is an excellent book. I would highly recommend it. The book is simple, but fun and engaging. It makes an abstract concept concrete and easy to understand, even for younger preschool aged children. The handy poster is a great reminder to have in your clinic or classroom.

Thank You, Sonali!

The Use of Oral-Motor Techniques to Improve Speech Production

Using oral-motor techniques to work on articulation continues to be controversial in the field of speech-language pathology. Recent research appears to indicate that use of oral motor techniques do not in fact demonstrate better outcomes in terms of speech production. However, when reviewing any research it is important to understand that the study was carried out on a small group of participants. As parents and professionals we know that no two children are alike in terms of their deficits or their strengths. Techniques and treatment methods that work for one child may prove to be ineffective for another and vice versa. It is therefore my opinion that each child must be evaluated as an individual with unique needs and abilities. Techniques that work on building lip strength in a child with poor lip seal resulting in drooling and errors in production of bilabial sounds “p,” “b,” “w,” and “m” may in fact be effective.

I believe a detailed evaluation that includes an assessment of a child’s jaw, tongue and lips: their strength, coordination and dissociation (i.e. the ability to move independently of the other) is key to determining their effect on speech production. However, I cannot emphasize how important it is to always use oral motor techniques in conjunction with direct speech production therapy. It may not result in the desired articulation changes if used in isolation.

Cycles Approach

Cycles Approach to treating multiple articulation errors in children with poor speech intelligibility

Children often demonstrate errors in the production of sounds like /s/, /r/ and /l/. When a child presents with a few specific sound errors, a traditional articulation treatment is warranted. However, for some children the sound error includes a wide range of sounds and severely impacts their speech intelligibility. Their errors often follow patterns such as omission of final sounds in words (e.g. saying “ca” for “cat.”). Hodson and Paden (1991) proposed the “Cycles Approach” in which these patters are targeted in a specific sequence. The treatment includes specific treatment strategies used in each session such as auditory bombardment, a communication activity, drills and a generalization activity. Evidence suggests that treatment approaches that target patterns of sounds rather than each specific misarticulated sound for children with multiple errors are more efficient thereby reducing the overall treatment time. The more dramatic impact of using an approach such as the Cycles Approach is a significant impact in the child’s speech intelligibility. This video (Thank You, Sonali!) is a “Before and After Cycles Program” of a child (age 3 years). The little girl demonstrated multiple sound errors using essentially vowels to communicate. Following several months of intervention, she could produce complete sentences that are intelligible even to unfamiliar persons. The remarkable difference in her speech is impressive evidence of the overall effectiveness of the program.